The kit lens. Usually known as the 18-55mm f/3.5-5.6. Practically everyone uses one, or used to. It’s the lens many of us got our start with, and it’s kind of hard not to own one when they’re bundled with entry-level DSLRs practically for free. For me, the 18-105mm kit lens Nikon bundled with the D90 was where it all started. It wasn’t until late my first semester of college that I picked up a used and beaten-up (but still astonishingly potent, to me) Nikon 80-200mm f/2.8 on eBay.
Anyways, back to kit lenses. There’s a reason that specific lens, the 18-55mm, is the one that Nikon, Canon and everyone else bundles with their cameras: it can do a ton of stuff at a rock-bottom price. Sweeping landscapes stopped-down at 18mm. Pleasant portraits wide-open at 55mm. And everything else in between. Unfortunately, the tradeoff that comes with this flexibility is not being particularly stellar at anything. And low-light photography is one of the biggest weaknesses of a kit lens, if not its very kryptonite. That’s mainly down to its tiny aperture: A larger aperture lets in more light, leading to better overall low-light performance, but f/3.5-5.6 is practically the smallest aperture range you can find in a modern lens. Fortunately, if you know how to make good use of it, you can still get a lot out of a kit lens in low light conditions. Since plenty of photo enthusiasts own just a DSLR + kit lens, and no tripod, here’s our tips for shooting at night handheld with a kit lens, plus the secret weapon your kit lens already has for the task!
1. Keep the Aperture Wide Open
To start, you’ll want to use Aperture Priority (labeled A or Av) or Manual (labeled M) mode on your DSLR. Never used those modes before? Now’s as good a time as any. I’ll have more info on how exactly to use those modes later on down the page.
Zoom your lens to 18mm, or whatever its widest setting is. Then set your aperture to f/3.5, or however large it’ll go (a smaller number corresponds to a larger aperture). With your aperture set as large as possible, you’re taking in as much light as your lens can. For night photography with a kit lens, there’s no reason to not be at max aperture. Three typical reasons to reduce your aperture are (1) to be able to use a slower shutter speed, (2) to get a longer depth-of-field, or (3) for improved sharpness. But in low light you’ll be struggling to maintain a fast-enough shutter speed even at large apertures, and with the small max apertures that kit lenses have, you’re unlikely to need greater depth-of-field and any additional sharpness you’d gain is minimal. Just leave it at f/3.5.

2. Avoid Zooming: Zoom With Your Feet
Yes, this advice defeats the purpose of owning a zoom lens. But there’s a time and place for everything, and low light is not the time for zooming. Zooming a kit lens in low light hurts you in two ways at once: you’ll be forced to both (1) use a smaller aperture, and (2) use a faster shutter speed.
Kit lens are variable aperture. That means the size of the aperture decreases as you zoom in: f/3.5 at 18mm, but only f/5.6 at 55mm. In other words, the lens can take in less than half as much light when zoomed to 55mm, as it can at 18mm. Something you definitely don’t want when available light is already low.
As an example, Imaging Resource’s review of the Nikon kit lens includes a table illustrating how its aperture gradually decreases as you zoom in. Manufacturers make variable aperture zoom lenses because they’re easier to design and cheaper to manufacture than constant aperture ones.
Not only are you unwittingly lowering your max aperture when you zoom, but you’re also forcing yourself into using faster shutter speeds to reduce blur. The relationship between focal length and shutter speed is commonly described as the 1/Focal Length Rule. Basically, it says that the fastest shutter speed you can use at a given focal length is the reciprocal of it. So at 20mm, you can do 1/20”. But at 40mm, you can only do 1/40”—taking in half as much light. The rule isn’t as relevant anymore with the introduction of digital photography, but the general principle—that there’s a direct link between slowest shutter speed and focal length—remains intact. Keep your focal length low, and you’ll be able to use the slow shutter speeds you need to take in enough light.
Overall, zooming your kit lens is practically self-sabotage. Zoom with your feet instead.
3. Slow Shutter, Several Shots
Possibly the single biggest benefit of digital over film is that you can take practically unlimited photos: a decent memory card holds thousands, while a roll of 35mm film holds just 24-27. How do you use that to your advantage in low light? Set a slower shutter speed than you normally would’ve been able to, yet still get a blur-free image, by shooting multiple copies of each photo and picking out the best one. Blur is random—it’s caused by tiny movements that you can’t control or even notice—so if you take the same photo several times, one’s bound to be sharp just out of pure luck. Set your camera to shoot bursts and you can take as many photos as you want with one long shutter press, which makes using this method very convenient.
Personally, I know that I can take a steady photo at 1/30” at 24mm; that’s the lowest I’ll go if I can only take the photo once. But if I can take multiple shots, I know that with a shutter speed of 1/8”, usually one out of five of my shots will be sharp. This will be different for everyone depending on how naturally steady they are, so it’d be wise to experiment at home and find out what your personal shutter speed thresholds are. Additionally, by improving how you hold your camera you can get better results.

Speaking of steadiness, this is the secret weapon built into most kit lenses that was alluded to earlier—they practically all have optical image stabilization systems. These systems are a godsend in low light because they let you use shutter speeds ~4-10 times slower than you would’ve been able to otherwise. While they’re becoming more and more common, a lot of older zoom lenses and most prime lenses don’t have them, which means that an 18-55mm kit lens is actually a better lens to use in low light (assuming you’re not shooting moving subjects) than an old 28-70mm f/2.8 “fast zoom” lens, or say, a 35mm f/2 prime lens, even though both of those would traditionally be considered low light lenses due to their large, “fast” aperture (fast because a large aperture lets you use faster shutter speeds). Anyways, forget the old 1/focal length rule and let the stabilizer work its magic by using extra-slow shutter speeds; you can go a lot slower than 1/focal length with a stabilized lens. And as mentioned earlier, do some experimentation at home to find out exactly how low you can go.
4. Be Stingy with the ISO
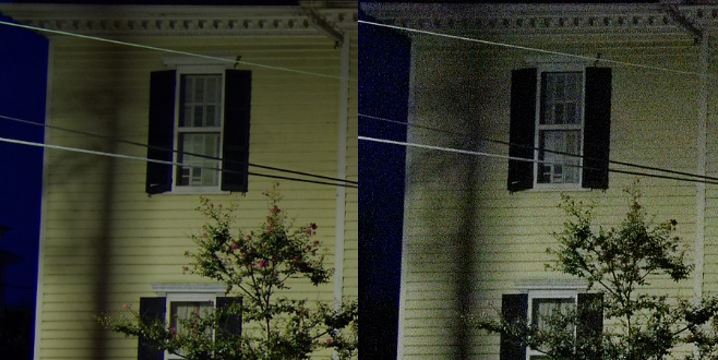
The last few tips were all about getting the largest aperture and slowest shutter speed you could, both to take in as much light as possible. Well, all that optimizing of shutter speed and aperture leads to this: ISO. ISO is like a volume dial for the image sensor, and just as microphones pick up more noise when you turn up the volume, an image sensor gets noisier when you turn up the ISO. You should aim for your ISO to be as low as possible to prevent noise from tarnishing your night photos. Fortunately, modern image sensors are incredibly good with noise control, so this task has never been easier. With recent entry-level and midrange DSLR sensors, you can go up to the low-thousands and still maintain acceptable levels of noise, although less noise is always better: even if the resulting image looks good as-is, lower noise will give you more leeway to edit your image without it turning into a grainy mess later. The following illustration is heavily exaggerated, as noise reduction was completely turned off and the images were deliberately underexposed (underexposing brings out noise, because shadow noise is the most noticeable). But it should make it pretty clear that noise is to be avoided.
In general, you should set your ISO to the lowest level that lets you maintain a sufficiently high shutter speed. For example, if my camera’s at ISO 100 and the autoexposure system (the exposure meter) says my shutter speed should be 2”, I’d bump the ISO up to 1600 to get a 1/8” shutter speed, which as mentioned earlier is the slowest I’m comfortable doing a multi-shot burst with. Then, when I move to a brighter or darker scene, I’d lower or raise my ISO accordingly to do 1/8” again. However, if a scene is bright enough that I could set the ISO under 1000 and still do 1/8”, I’d consider raising my shutter speed instead to raise the certainty of a sharp image—there’s not much noise below 1000 so it’s a worthwhile tradeoff.
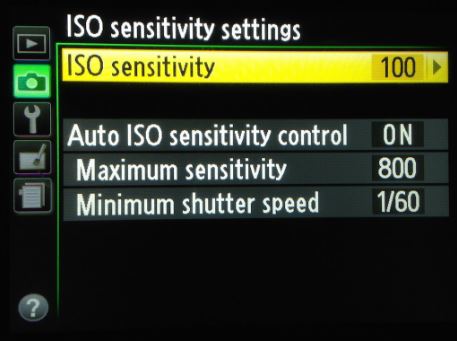
This ISO/shutter speed balancing act can be tedious, having to precisely readjust for every new photo, but can make a big difference in the end result. Fortunately, Nikon and Canon DSLRs have useful Auto ISO settings, where you can set your own minimum shutter speed and the camera will adjust ISO to hit that shutter speed. This is a good route to go if you’re not shooting in Manual.
5. Autofocus on Easy Targets
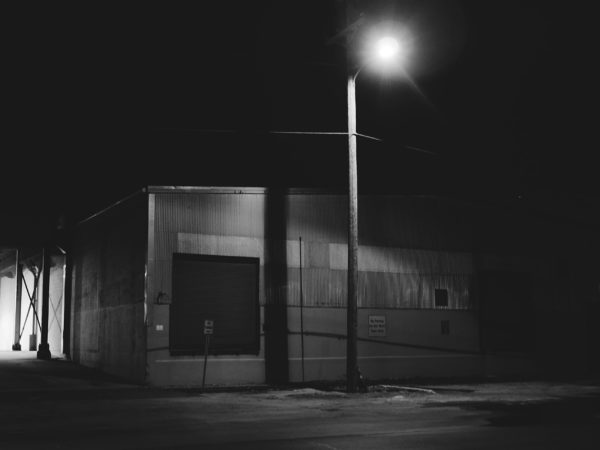
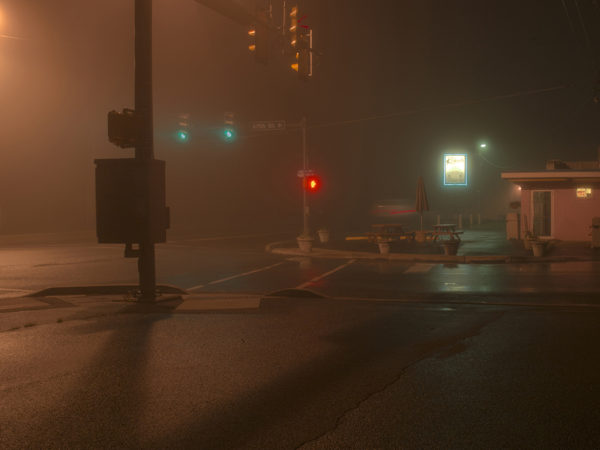
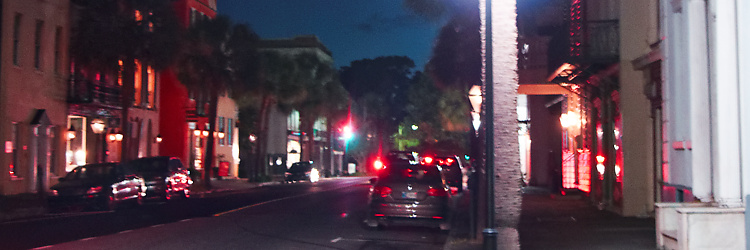
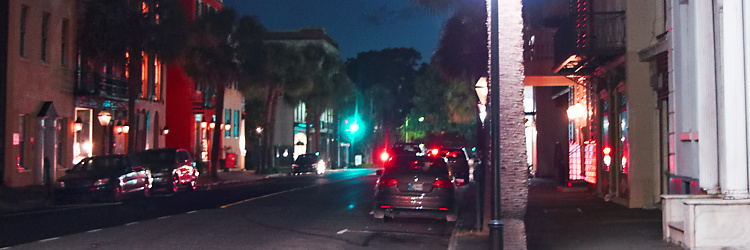
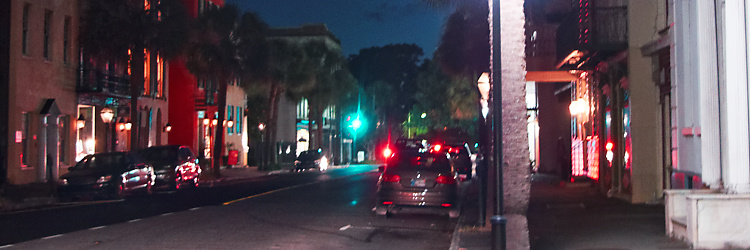
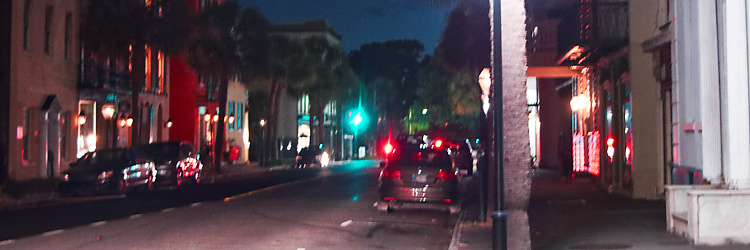
Now that you’re an expert at optimizing exposure settings for night photography, here’s a tip about autofocus. Autofocus sensors can have a hard time locking focus at night, which makes sense because if there isn’t any light hitting a focus point, it can’t see anything to focus on. So focus on areas of light for the most accurate autofocus. Here’s an example scene:
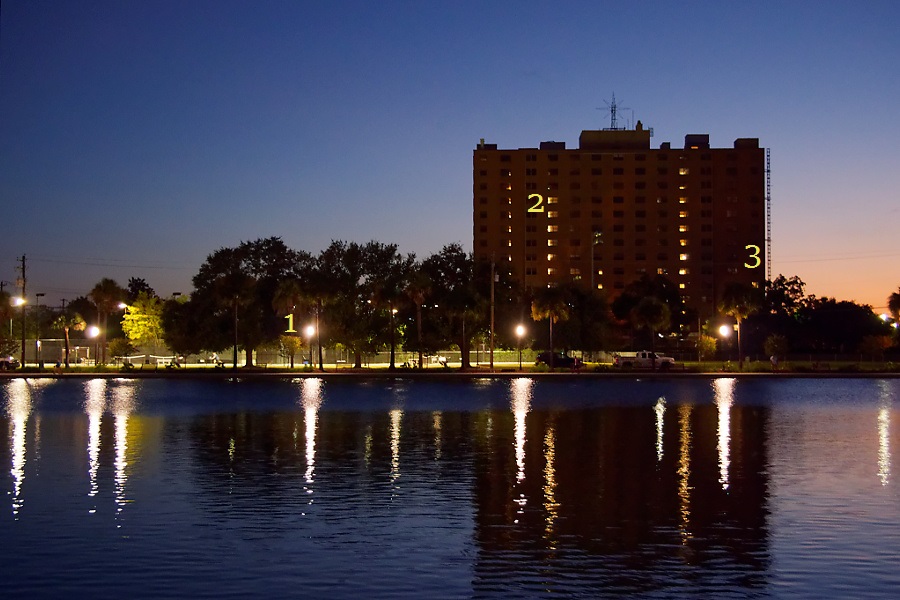
In this shot, if your camera initially fails at focusing, your best option would be to have it focus on the edge of a streetlamp (1). It’s almost certain to lock focus there. But if there aren’t streetlamps in your shot, the next thing you could try is indirect lighting, like a lit window (2). Finally, if there isn’t any lighting at all, find an area of sharp contrast to focus on, like the edge of a street sign or building (3).
To hit a desirable focusing object, you may need to focus and recompose. In other words, point your camera so that the object you want to focus on is over a focus point, press the shutter release halfway to get your camera to focus, then point your camera back to your picture and release the shutter (this process might be slightly different depending on how you’ve set up your camera). Of course, the desirable focusing object needs to be a similar distance away from you as the area you actually want to be in focus.
6. Don’t Hesitate To Go Manual
To wrap things up, nighttime is a challenging environment for cameras, and even though they’re trying their hardest, they might not always get it right. Sometimes they’ll just flat-out fail to lock focus in a dark scene, or sometimes harsh, direct lighting will leave the exposure meter hopelessly off. So don’t be afraid to go manual! Spending time in manual mode can be frustrating at first, but getting the hang of it will change how you approach photography. Having to think about things that you normally don’t consider, like the intricacies of precision focus and depth-of-field, causes you to understand them more completely.
Hope this helps! If you take a cool picture with a kit lens using something you learned here, share it with us!
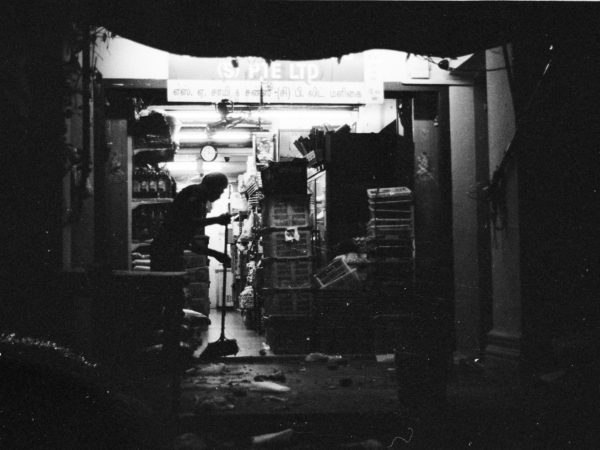
(Note: The cover photo for this article was taken with a Panasonic GX8 and Panasonic 12-60mm f/3.5-5.6 lens set at 12mm, f/3.5, 1/8sec, ISO 800 (so following all the rules set out in this article 🙂 ) during the same outing all the sample photos within the article are from.)